
Osclass has very powerful feature that allows you to setup subdomains based on your data (dynamical subdomains).
Subdomain types:
- User based subdomains
- Category based subdomains
- Location based subdomains. This includes country, region and city
Updates in Osclass
- Go to your file system or FTP open config.php located in root folder of your osclass installation
- Change:
define('WEB_PATH', 'https://yourdomain.com/');Into:
define('WEB_PATH', 'https://' . $_SERVER['HTTP_HOST'] . '/');
define('COOKIE_DOMAIN', 'domain.com');
Note that we’ve also defined COOKIE_DOMAIN that will help to transfer cookies accross domain and subdomains. So for example if you login as admin in domain.com, you will be logged-in as admin in *.domain.com as well. Same is valid for users and other Osclass cookies & session data.
No other settings are needed for cookies & sessions, as this affect both of them.
- Save updates made in config.php
- Log in to your Oc-admin
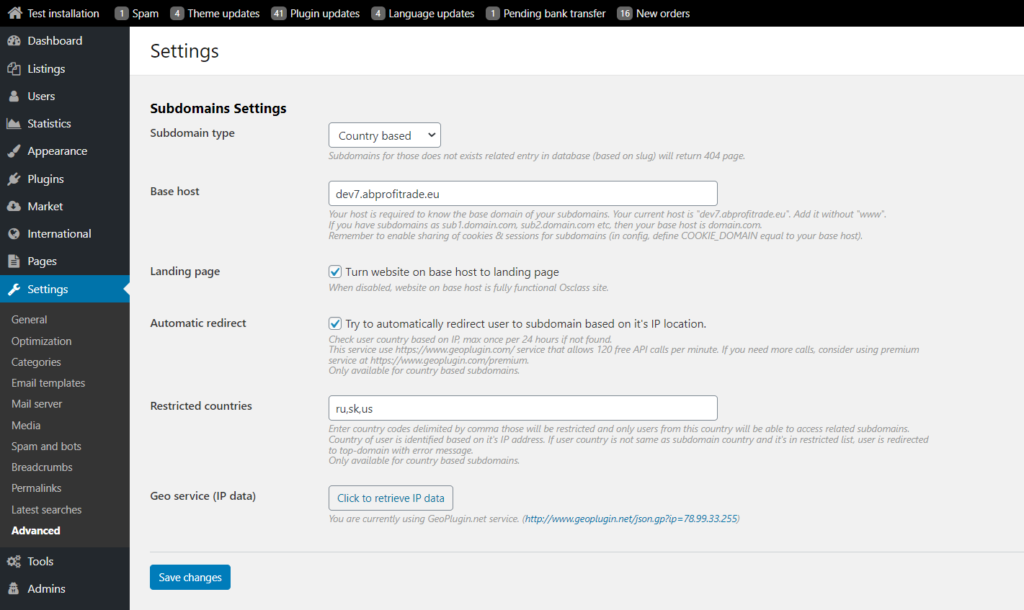
- Go to Settings > Advanced
- Select your subdomain type in the select box and press “Save changes” button
Your Osclass is now ready for subdomains. It will still work as usual on base domain.
Now continue to required updates on hosting side to make subdomain URLs work and show content from base domain.
Updates on hosting
- Log in to your hosting backoffice or control panel (cPanel)
- Go to the subdomains section and create new subdomain
- Enter star sign (*) as subdomain name
- Alternatively, you may create masked redirect of *.domain.com to domain.com – masked means that you stay on *.domain.com, but content is loaded from domain.com
Some hosting companies may require to create “A” record in DNS that will point out to domain.com IP address or configuration of Apache.
Let’s check it out step by step.
DNS Wildcard
First, you must identify to which IP resolve any of your subdomains.
So, country1.domain.com will resolve the same IP as country2.domain.com and all these will be same as IP of domain.com.
In the examples we will use as your IP server 127.0.0.1 and as a domain domain.com.
You should replace this values for your IP and domain.
These may vary based on DNS Manager.
We will create “A” record for DNS.
Bind
*.domain.com. A 127.0.0.1
Finally, if you have another subdomain pointing to another IP, you should just specify it before the wildcard (*).
As example you may not want to resolve mail.domain.com to same IP as your domain.com.
Once done, it can take up to 24 hours until new DNS records take effect (depends on hosting, mostly within several minutes).
Apache Wildcard
Each hosting service can be specific, here we will explain VirtualHost configuration.
<VirtualHost *:80>
  ServerName domain.com
  ServerAlias *.domain.com

  CustomLog /var/log/apache2/domain.com_access_log combined
  ErrorLog /var/log/apache2/domain.com_error_log

  <Directory /var/www/domain.com/web>
    Options -Indexes FollowSymLinks -MultiViews
    AllowOverride All
    Order allow,deny
    allow from all
  </Directory>
</VirtualHost>
This configuration says that any call that comes to any subdomain of domain.com will go to the Osclass installation folder (*.domain.com >>> domain.com).
Alternative #1
On some hostings, like hostgator, it is required just to create wildcard subdomain and point it to /public_html folder (share document root).
Alternative #2
If all above steps has failed, simply copy content from Osclass installation directory (public_html) and copy whole content to wildcard subdomain folder. Note this may not be handy as you need to keep all files in sync with based folder and do updates in config.php in base folder + subdomain folder.
SSL / https setup
Once you have your subdomains setup, make sure you use https and correct SSL certificate.
Usually, only what you need to make sure is that your current SSL certificate covers all subdomains (*.domain.com), but in some cases, this may not be enough.
Example is, when you run subdomain on your.domain.com and subdomains are *.your.domain.com, in that case i.e. Let’s encrypt certificate may not cover subdomains and can report errors.
This can be fixed! … but only for those subdomains where you know all entries and it’s less than 100 of them (country/region subdomains, but optionally also city subdomains, if you have just few cities).
Solution is to create certificate for each subdomain specifically, not using wild card:
- sub1.your.domain.com
- sub2.your.domain.com
- sub3.your.domain.com
- etc…
This will avoid using wild cards and secure your subdomains with valid SSL. In case you need wildcard on this level, you may need to look for paid SSL certificate that can handle not just *.domain.com wildcard, but also *.*.domain.com wildcard.
Now you have subdomain based classifieds!
Data used in subdomains and subdomain generated parameters
You may wonder what kind of data are used to create subdomain URL, especially what is replaced by “*”
- User– username field from user profile (it’s like slug!). That is also reason why username must be unique. Example: johndoe.domain.com.
Parameter sUser will contain user ID. - Category– category slug, must be unique. Example: cars.domain.com, for-sale.domain.com.
Parameter sCategory will contain category ID. - Country – country slug. Example: united-states.domain.com. You might want to change country slug to have it like us.domain.com, de.domain.com etc using country code instead.
Parameter sCountry will contain country code. - Region– region slug. Example: alabama.domain.com
Parameter sRegion will contain region ID. - City– city slug. Example: los-angeles.domain.com
Parameter sCity will contain city ID.
In case you access subdomain to that does not exists entry in database, Osclass returns 404 page.
You may get parameter value also by calling osc_subdomain_id() that contains ID of current subdomain (empty on top-domain).
Slugs for locations can be configured in “Backoffice > International > Locations”, for categories in “Backoffice > Settings > Categories” and for users in “Backoffice > Users > Edit user”